What Is This?
BT2N64 lets you use a wide range of Bluetooth controllers — PS5, Xbox, Switch Pro, 8BitDo, and more — on a real N64 console. Pair a supported wireless controller, plug the adapter into a controller port, and play N64 games without wires.
Why would you want this?
- Wireless controllers on N64 — no more tripping over controller cables
- Modern ergonomics — use a DualSense or Xbox controller instead of the N64's famously unusual trident
- Rumble support — the adapter emulates a Rumble Pak, so vibration gets forwarded to your Bluetooth controller
- 3 button profiles — Default, FPS (GoldenEye/Perfect Dark), and Mario (Super Mario 64)
- Works from cold boot — power on the N64 and the adapter is ready immediately
This build requires only 3 solder connections — it's one of the simpler console adapter builds.
Supported Controllers
The Pico W and Pico 2 W have built-in Bluetooth (Classic BT + BLE via the CYW43 radio), giving you wide controller compatibility:
| Controller | Status |
|---|---|
| DualSense (PS5) | ✅ |
| DualShock 4 (PS4) | ✅ |
| DualShock 3 (PS3) | ✅ |
| Xbox One / Series X|S (Bluetooth mode) | ✅ |
| Switch Pro Controller | ✅ |
| 8BitDo controllers (Bluetooth) | ✅ |
| NSO GameCube Controller | ✅ |
| Generic BT HID gamepads | ✅ (basic) |
Parts List
| Part | Price | Where to Buy |
|---|---|---|
| Raspberry Pi Pico W (or Pico 2 W) | $6–7 | Raspberry Pi / Adafruit |
| N64 controller extension cable | $5–8 | Amazon / eBay / AliExpress |
| Soldering iron + solder | $15–30 | If you don't have one |
| USB data cable | ~$5 | For flashing firmware (Micro-USB for Pico W, USB-C for Pico 2 W) |
The three wires you solder come from inside the extension cable — no separate hookup wire needed.
Total: ~$20–30 (less if you already have tools).
Board choice: The Pico W (Micro-USB) and Pico 2 W (USB-C, RP2350) both work. Same Bluetooth support, same wiring — just build/flash the matching firmware.
Step 1: Prepare the N64 Cable
Cut one end off an N64 controller extension cable. You want the male end (the plug that goes into the N64 console's controller port). Strip back the outer jacket to expose the inner wires, then strip about an inch (~25mm) of insulation off each wire so it's easy to solder to the Pico.
N64 Controller Port Pinout
The N64 controller connector is a 3-pin connector. Looking at the console-side (female) port:
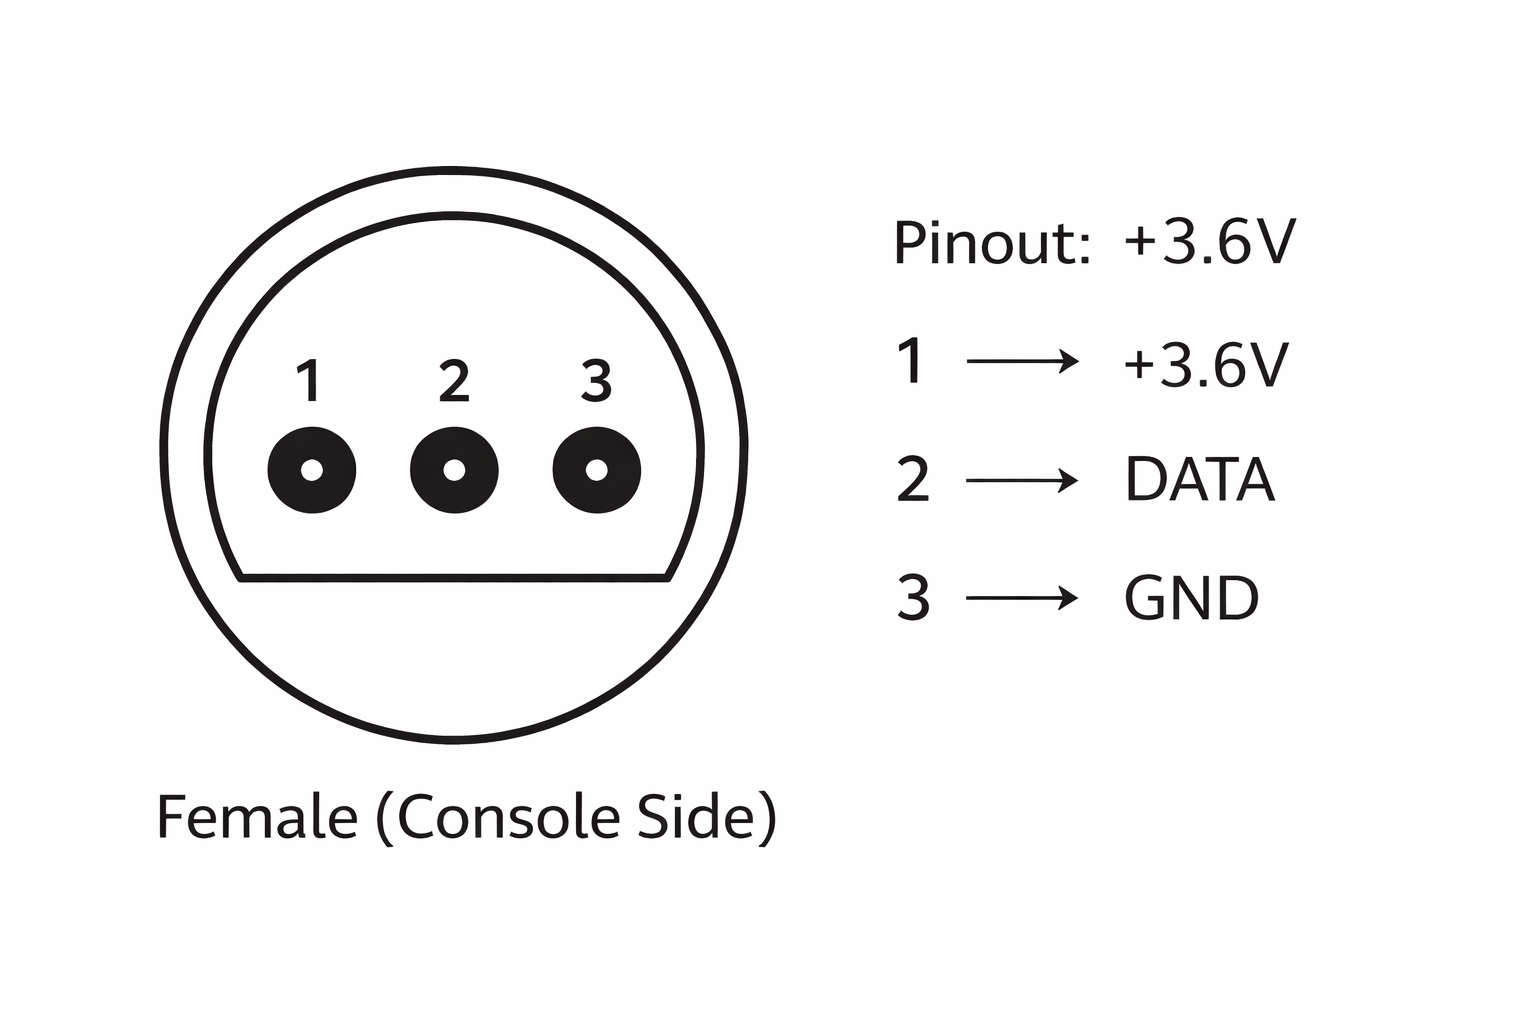
| Pin | Signal | Description |
|---|---|---|
| 1 | +3.6V | Power from console |
| 2 | DATA | Bidirectional joybus data (3.3V logic, open-drain with pull-up) |
| 3 | GND | Ground |
You need all 3 connections: DATA, +3.6V, and GND.
Use a multimeter to verify which wire goes to which pin — N64 cables aren't always color-coded consistently.
Step 2: Wire It Up
N64 Console → Pico
| N64 Port Pin | Signal | Pico Pin |
|---|---|---|
| Pin 2 | DATA (joybus) | GPIO 2 |
| Pin 3 | GND | GND |
| Pin 1 | +3.6V (power) | VSYS |
That's it. Three wires.
Important Notes
- GPIO 2 is the DATA pin for this build target (the firmware is built with
N64_DATA_PIN=2for the Pico W / Pico 2 W). - The N64 uses a single-wire bidirectional joybus protocol at 3.3V logic levels, open-drain with a pull-up.
- No external pull-up resistor is needed. Wire the data line straight to GPIO 2 — don't add one.
- +3.6V from the console (Pin 1) goes to the Pico's VSYS pin to power the adapter from the console. This lets the adapter run from cold boot with nothing else plugged in.
Prefer to power it over USB?
Console power is the recommended wiring — it's what lets the adapter come up from cold boot with nothing else plugged in. If you'd rather power the board from USB instead, that works too: skip Pin 1 and wire only DATA and GND.
Step 3: Flash the Firmware
Download the UF2
Go to github.com/joypad-ai/joypad-os/releases and download the file matching your board:
| Board | Firmware File |
|---|---|
| Pico W | joypad_*_bt2n64_pico_w.uf2 |
| Pico 2 W | joypad_*_bt2n64_pico2_w.uf2 |
Build from source (optional): If you'd rather build it yourself, run
make bt2n64_pico_w(ormake bt2n64_pico2_w) from the joypad-os repo to produce the UF2.
Enter Bootloader Mode
- Disconnect the Pico from everything
- Hold the BOOTSEL button (small white button on the board)
- While holding BOOTSEL, plug the USB cable into your computer
- Release BOOTSEL
- A drive appears —
RPI-RP2(Pico W) orRP2350(Pico 2 W)
Flash
- Drag and drop the
.uf2file onto the drive - Drive auto-ejects — firmware is flashed
- The Pico reboots and is ready to pair
Step 4: Pair Your Controller
- Connect the adapter to the N64 controller port
- Power on the N64 — the adapter starts automatically and scans for controllers on boot
- Check the onboard LED to see what state you're in:
| LED Pattern | What It Means |
|---|---|
| Fast blink (100ms) | N64 not communicating — check wiring |
| Slow blink (400ms) | N64 connected, no Bluetooth controller paired |
| Very fast blink (50ms) | Both connected, but no data flowing yet |
| Solid on | Everything working — you're good to play! |
- Put your controller into pairing mode:
- PS5: Hold Share + PS button until light bar flashes rapidly
- PS4: Hold Share + PS button until light bar flashes
- Xbox: Hold the small pair button on top until the Xbox button flashes
- Switch Pro: Hold the sync button on top of the controller
- The adapter automatically scans on boot — your controller should connect within a few seconds
- Once paired, the controller reconnects automatically every time
Managing Pairings
- Click BOOTSEL — starts a 60-second scan for new controllers
- Hold BOOTSEL — disconnects all controllers and clears all saved pairings (start fresh)
Step 5: Play!
Once the LED is solid, you're connected. Start a game and play!
Button Mapping Profiles
BT2N64 has 3 profiles optimized for different game types. To switch:
- Hold Select for 2 seconds
- Press D-Pad Up/Down to cycle
- Controller rumbles to confirm
Default Profile
General-purpose mapping with right stick → C-buttons:
| Your Controller | N64 |
|---|---|
| Cross / A | A |
| Square / X | B |
| Circle / B | C-Down |
| Triangle / Y | C-Left |
| LB / L1 | L |
| RB / R1 | R |
| LT / L2 | Z |
| RT / R2 | C-Right |
| Select | C-Up |
| Start | Start |
| Home / Guide | Start |
| Right Stick | C-buttons (threshold) |
| Left Stick | Control Stick |
| D-Pad | D-Pad |
FPS Profile
Optimized for GoldenEye 007, Perfect Dark, and other N64 shooters:
| Your Controller | N64 | Why |
|---|---|---|
| Cross / A | B | Attack |
| Circle / B | A | Action / interact |
| RB / R1 | Z | Shoot (easier to reach) |
| LB / L1 | R | Aim / targeting mode |
| Right Stick | C-buttons | Strafe and look |
Mario Profile
Optimized for Super Mario 64 and platformers:
| Your Controller | N64 | Why |
|---|---|---|
| Cross / A | B | Punch / attack |
| Circle / B | A | Jump |
| LT / L2 | Z | Crouch / ground pound |
| L3 (left stick click) | Walk modifier | 50% stick — for walking, not running |
Rumble
The adapter emulates an N64 Rumble Pak. Games that check for a Rumble Pak will detect one, and when they activate rumble, the vibration gets forwarded to your Bluetooth controller.
Tested working with:
- Star Fox 64
- Super Mario 64 (Shindou edition)
- The Legend of Zelda: Ocarina of Time
- And many more
Rumble intensity is scaled for Bluetooth controllers — the heavy motor runs at about 50% for a nice feel without being overwhelming.
Troubleshooting
Fast LED Blink — N64 Not Communicating
This means the adapter isn't talking to the N64 console:
- Check your wiring — DATA (GPIO 2), power (+3.6V → VSYS), and GND
- Make sure the solder joints are solid (no cold joints)
- Verify the correct pins on the N64 cable with a multimeter
- Try pressing the N64 reset button
- Make sure the cable plug is fully seated in the controller port
Slow LED Blink — No Bluetooth Controller
The N64 connection works, but no controller is paired:
- Make sure your controller is in pairing mode (not just powered on)
- Click BOOTSEL to trigger a 60-second scan
- Hold BOOTSEL to clear all bonds and start fresh
- Move the controller closer to the adapter for initial pairing
- Some controllers need to be in a specific BT mode (Classic BT vs BLE)
Buttons Not Responding in Game
- Verify the LED is solid (data flowing)
- Try cycling profiles — you might be on one where the buttons are mapped differently (hold Select + D-Pad)
- Try a different game to rule out game-specific issues
Controller Disconnects Frequently
- Charge your controller — low battery is the most common cause
- Move closer to the adapter (BT range is ~10m / 30ft)
- Hold BOOTSEL to clear bonds and re-pair from scratch
- Avoid other Bluetooth devices nearby that might cause interference
Rumble Not Working
- Not all N64 games use the Rumble Pak — try Star Fox 64 to verify
- Make sure your Bluetooth controller supports vibration
- The adapter must see a Rumble Pak query from the game — some homebrew may not send this
Can't Enter Bootloader for Reflashing
- You need to disconnect from the N64 first — hold BOOTSEL and connect to your PC via USB
- The BOOTSEL button is small — use a pen or tweezers if needed
What's Next?
- BT2USB Guide — Same Bluetooth magic but outputs to USB instead
- USB2GC Guide — USB controllers on GameCube (similar concept, different console)
- GC2USB Guide — GameCube controller to USB
- Controller Archive — Full list of supported controllers and pairing instructions
- Community Discord — Share your build, get help
Estimated build time: 30–60 minutes (3 solder connections). Difficulty: Medium.